
作者介绍
余澈,中国联通大数据技术部平台组核心技术负责人,项目管理高级工程师,具有多年大数据平台运维管理及开发优化经验。管理过多个上千节点集群,擅长对外多租户平台的维护开发。信科院大数据性能测试、功能测试主力,大厂PK获得双项第一。
由于其易用性好,以及现在机器学习和人工智能的崛起,Python成为当前非常火热的一门语言。承载多租户的大数据平台往往对于Python版本和第三方库有很多个性化的需求,联通大数据平台承载了百度、阿里、腾讯、苏宁、京东等上百个租户,在租户部署模型时就会要求集群计算节点拥有不同类别的Python科学计算包。下文将主要讲述如何在CDH集群基于二次打包的Anaconda安装包部署Python多版本运行环境,并搭建本地Python第三方库。
一般生产环境默认python版本为2.7,为了提供多版本python开发环境。需要先下载anaconda的parcel安装包并解压到本地,安装python3虚拟环境,然后安装集群计算节点所需要的常用python第三方包,如TensorFlow等科学计算包。
需准备:
电脑准备300G或以上的存储空间;
wget:下载某个源的所有package到本地;
Nginx:发布本地PyPI。
首先我们先进行Anaconda.Parcel的解压和Python3环境的创建:
第一步:下载Anaconda的Parcel包。
参考链接:https://repo.continuum.io/pkgs/misc/parcels/archive/
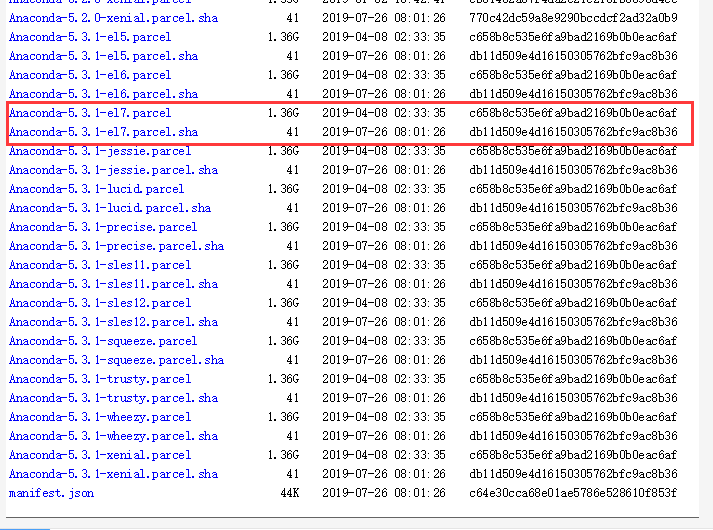
第二步:解压Anaconda的Parcel包,安装Python3私有环境。

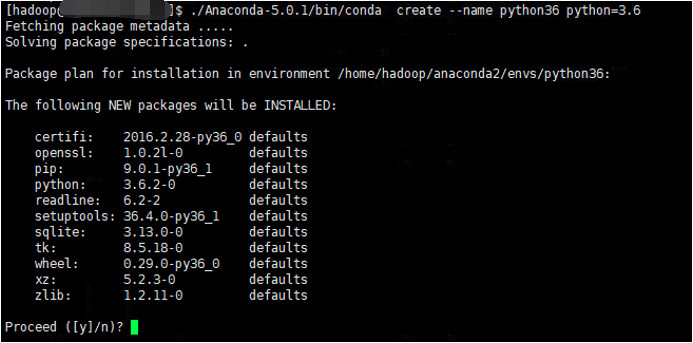
安装好后显示环境如下:


安装私有的Python第三方本地库,Python第三方库分为pip和Conda库两种安装方式(最后我们选择Conda,比pip功能更强大,完善包及虚拟环境管理工具):
Conda私有库安装方式:
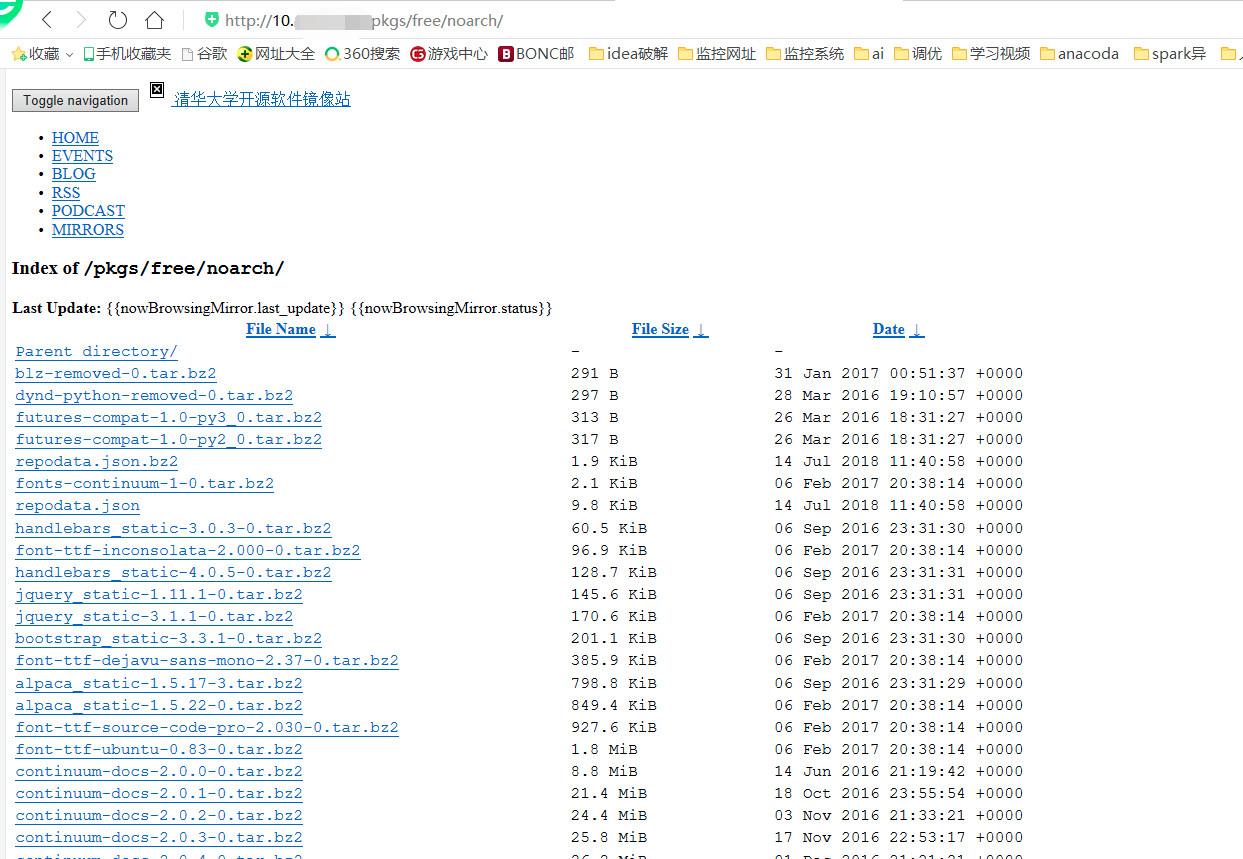
首先通过外网下载所有第三方包,第三方包在清华镜像站,虽然有部分包不是最新版本,但下载速度快。
参考链接:https://mirrors.tuna.tsinghua.edu.cn/anaconda/pkgs/free/
由于公司主机不能连接外网。这里就省事地通过Windows安装wget全量捞取页面所需包。
Windows安装wget:
以管理员身份运行CMD,下载安装wget。
C:\WINDOWS\system32>
@"%SystemRoot%\System32\WindowsPowerShell\v1.0\powershell.exe" -NoProfile -InputFormat None -ExecutionPolicy Bypass -Command "iex ((New-Object System.Net.WebClient).DownloadString('https://chocolatey.org/install.ps1'))" && SET "PATH=%PATH%;%ALLUSERSPROFILE%\chocolatey\bin"
C:\WINDOWS\system32>
choco install wget
wget安装完毕,如果想更新,就输入:
C:\WINDOWS\system32>
choco upgrade wget
下载第三方Python包:
通过UE列操作范围选择过滤各个包名,存入txt。然后使用wget读取txt下载,下载时间大概持续7~8个小时。
-b 后台,-c 断电追加, -i 读取文档多个连接, -p下载urls下所有文档, -f指定日志文件位置。
wget -b -c -i C:\conf\pyku.txt -p C:\conf\ku -f C:\conf\wget-log
Linux,安装Nginx,并配置本地文件HTTP映射。
具体Nginx配置如下:
先配置两个页面:
/usr/share/nginx/html
index.html
<!DOCTYPE html>
<html>
<head>
<title>Welcome to nginx!</title>
<style>
body {
width: 35em;
margin: 0 auto;
font-family: Tahoma, Verdana, Arial, sans-serif;
}
</style>
</head>
<body>
<h1>Welcome to nginx!</h1>
<a href="http://12.109.21.84/pkgs/free/">free</a>
<a href="http://12.109.21.84/pkgs/main/">main</a>
<p><em>Thank you for using nginx.</em></p>
</body>
</html>
free.html
cat free.html
<!DOCTYPE html>
<html>
<head>
</head>
<body>
<a href="http://12.109.21.84/pkgs/free/linux-64/">linux-64</a>
<a href="http://12.109.21.84/pkgs/main/linux-64/">linux-64</a>
</body>
</html>
/etc/nginx/conf.d
server {
listen 80;
server_name localhost;
#charset koi8-r;
#access_log /var/log/nginx/log/host.access.log main;
location / {
root /usr/share/nginx/html/;
index index.html index.htm;
}
location /pkgs/free {
alias /usr/share/nginx/html/pkgs/free/;
index index.html index.htm;
autoindex on;
autoindex_exact_size on;
autoindex_localtime on;
}
location /pkgs/free/linux-64 {
alias /opt/beh/core/condaku/freeku/;
autoindex on;
autoindex_exact_size on;
autoindex_localtime on;
}
location /pkgs/free/noarch {
alias /opt/beh/core/condaku/freenorch/;
index index.html index.htm;
autoindex on;
autoindex_exact_size on;
autoindex_localtime on;
}
#error_page 404 /404.html;
# redirect server error pages to the static page /50x.html
#
error_page 500 502 503 504 /50x.html;
location = /50x.html {
root /usr/share/nginx/html;
}
}
配置好之后,启动Nginx,查看本地页面如下:
配置condarc:
conda config --add channels http://12.109.21.84/pkgs/free/
conda config --add channels http://12.109.21.84/pkgs/free/noarch/
conda config --set show_channel_urls yes
vi ~/.condarc
删除 - defaults这一行,保存退出后,source ~/.condarc
安装第三方包:
使用命令conda install包名。

若在私有库没有的一些第三方库,也可以下载安装包之后移动到pkgs目录下。

使用pip安装whl包。

打包创建好Python3,安装好所需科学计算包的Anaconda,生成sha校验文件。
tar -zcvf Anaconda-5.0.1-el7.parcel Anaconda-5.0.1 --owner=root --group=root
sha1sum Anaconda-5.0.1-el7.parcel | cut -d ' ' -f 1 > Anaconda-5.0.1-el7.parcel.sha
将Anaconda和生成的sha校验文件一起拷贝到Parcel-Repo目录下。

通过CM的Parcel管理,进行Anaconda的分发激活。
下面还整理了一份搭建私有Python pip源的过程(Windows环境):
这个链接提供了Anaconda的安装,和使用国内镜像快速下载Anaconda(5~6M/s)。
准备300G或以上的存储空间;
bandersnatch:下载某个源的所有package到本地;
Nginx:发布本地 PyPI。
这个网站提供的是Linux的,不过Windows也能用,具体如下:
1)首先下载bandersnatch,因为装好了Anaconda,所以可以使用pip直接下载:
pip install bandersnatch
2) 生成配置文件 /etc/bandersnatch.conf。
bandersnatch mirror
注:这一步会报错,因为Windows没有/etc目录,直接在C盘下创建etc文件夹 ,然后再次运行会发现:C:\\etc\\bandersnatch.conf
文件被生成。
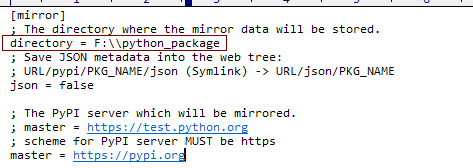
3)根据实际情况,重点修改以下两个配置,directory指 package在本地存放的位置,master指被同步的源。
[mirror]
; The directory where the mirror data will be stored.
directory = /srv/pypi
; The PyPI server which will be mirrored.
; master = https://testpypi.python.org
; scheme for PyPI server MUST be https
master = https://pypi.python.org
这部分需要修改为Windows,且directory目录至少要300G,包太多:
4)下载所有package至本地,我这要在Windows下的Anconda Prompt里面运行:

bandersnatch -c /etc/bandersnatch.conf mirror
$ bandersnatch -c /etc/bandersnatch.conf mirror
2014-01-15 09:49:26,556 INFO: bandersnatch/1.5 (CPython 2.7.6-final0, Linux 3.19.0-37-generic x86_64)
2014-01-15 09:49:26,558 INFO: Setting up mirror directory: /srv/pypi/
2014-01-15 09:49:26,559 INFO: Setting up mirror directory: /srv/pypi/web/simple
2014-01-15 09:49:26,560 INFO: Setting up mirror directory: /srv/pypi/web/packages
2014-01-15 09:49:26,560 INFO: Setting up mirror directory: /srv/pypi/web/local-stats/days
2014-01-15 09:49:26,561 INFO: Generation file missing. Reinitialising status files.
......
更新本地的pacakge,(我暂时没用到,刚下载完,再去更新,会发现全是文件已存在):
bandersnatch -c /etc/bandersnatch.conf mirror
5)安装并配置Nginx(我的是基于Windows,我安装的是下面链接的Nginx版本,没用最新的)。
参考链接:https://www.cnblogs.com/qfb620/p/5508468.html
测试Nginx可用后,关闭Nginx,然后修改配置文件:
D:\nginx\nginx-1.8.1\conf\nginx.conf
备份该文件,然后删除里面的server{........},用如下替换:
server {
listen *:80;
server_name localhost;
root F:\\python_package\\web;
autoindex on;
charset utf-8;
}
注:F:\\python_package\\web 是之前bandersnatch下载包之后自动生成的。
配置好之后,启动Nginx。
6)配置其他服务器的pip源(基于Windows)。
我这里用的是同一个局域网的其他Windows电脑。(能Ping通我的IP)
来到另一台电脑,安装Python后会自带pip,然后做如下操作:
参考链接:https://www.cnblogs.com/cwp-bg/p/8497075.html
打开查看隐藏文件夹选项后来到:(AppData为隐藏项目)C:\Users\Administrator\AppData\Roaming。
然后看有没有pip文件夹,没有就新建该文件夹,然后在该文件夹下新建pip.ini,输入如下:
[global]
timeout = 6000
index-url = http://我的机器ip/simple
trusted-host = 我的机器ip
7)测试pip install。
用配置好pip源的电脑,管理员运行CMD,输入如下:
pip install pymysql
结果如下:

生效,确实访问了我的IP下的pip源,并且路径一致,可以在我的电脑浏览器输入链接,找到该文件:
输入链接:http://我的机器ip/packages/ed/39/15045ae46f2a123019aa968dfcba0396c161c20f855f11dea6796bcaae95/
发现如下:
8)下一步,照搬到Linux。


如果字段的最大可能长度超过255字节,那么长度值可能…
只能说作者太用心了,优秀
感谢详解
一般干个7-8年(即30岁左右),能做到年入40w-50w;有…
230721