
本文将探讨如何在 Elasticsearch 中优化向量搜索,并提供了一个详细的教程。
一、Elasticsearch 神经搜索流程
Elasticsearch 从 2022 年 2 月发布的 8.0 版本开始,提供了基于向量的搜索和自然语言处理(NLP)功能。
下图清楚地展示了向量搜索引擎的工作原理。它涉及以下几个步骤:
将原始实体(如歌曲、图像或文本)转换为数字表示(向量 Embedding);
使用距离度量来表示向量之间的相似性;
使用近似最近邻算法(ANN)搜索与查询相关的数据。
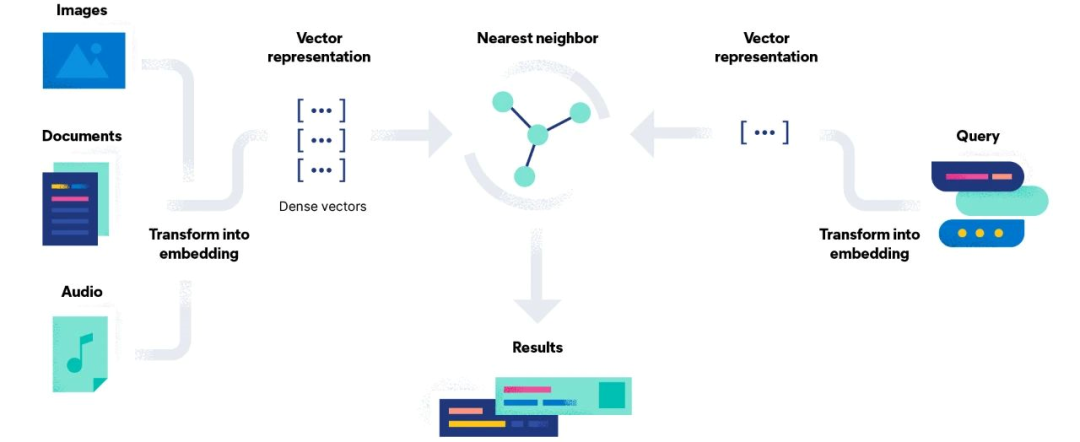
向量搜索图
与 Apache Solr 类似,Elasticsearch 在内部也使用 Apache Lucene 作为其搜索引擎,因此许多底层概念、数据结构和算法同样适用于两者。
在这种情况下,基于向量的搜索是构建在 Apache Lucene HNSW(Hierarchical Navigable Small World graph)上的,也就是 Lucene 9 中的原生 ANN(近似最近邻)。
实施基于 Elasticsearch 的神经搜索的端到端流程如下:
下载 Elasticsearch
外部生成向量
为向量搜索创建 Elasticsearch 索引
索引文档
利用向量字段进行搜索
现在,我们将详细描述每一步,以便你可以轻松掌握本教程。
让我们开始吧!
如前所述,基于向量的搜索已经集成到 Elasticsearch 8.0 中,在本教程中,我们使用的 Elasticsearch 版本为 8.5.3。你可以从下面链接下载:
https://www.elastic.co/downloads/past-releases#elasticsearch
请验证已下载文件的完整性,包括 SHA 和 ASC 密钥。
由于 Elasticsearch 是使用 Java 构建的,所以你需要确保系统中安装了 Java 开发工具包(JDK)。如果已经安装了 Java,请检查其版本是否为 17 或更高版本。
将下载的文件解压到你要使用的位置,然后从该文件夹打开终端,并在本地运行 Elasticsearch:
bin/elasticsearch
当你首次启动 Elasticsearch 时,安全性会自动启用。
更多信息请看:https://www.elastic.co/guide/en/elasticsearch/reference/current/configuring-stack-security.html
为了简化起见,在本教程中,我们通过在 elasticsearch.yml 文件(位于 /elasticsearch-8.5.3/config/ 目录下)中设置 xpack.security.enabled: false 来禁用安全性,并重新启动 Elasticsearch 节点。
你可以通过输入以下命令来验证 Elasticsearch 是否正确运行:
curl localhost:9200
现在,我们已经准备好使用 Elasticsearch 并与其 REST API 进行交互。可以通过以下几种工具来实现:
命令行(cURL),如本教程所示
Kibana 的开发工具控制台(也需要下载和部署 Kibana)
API 平台,如 Postman
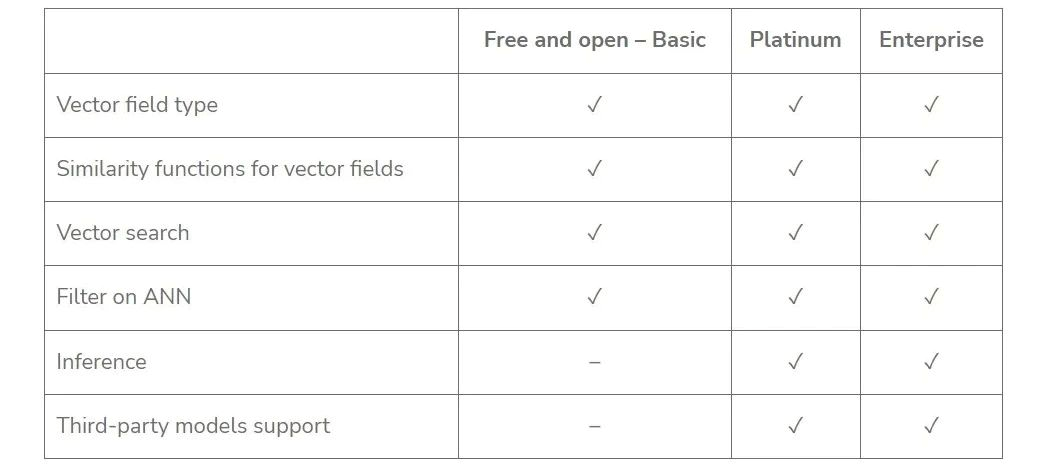
Elastic 8.0 允许用户在 Elasticsearch 中使用自定义或第三方的基于 PyTorch 开发的语言模型进行推断,但需要 Platinum 或 Enterprise 订阅才能体验到完整的机器学习功能。
Elastic Stack 订阅:https://www.elastic.co/subscriptions
如果你对探索这一强大的自然语言处理功能感兴趣,可以查看这篇文章 [1] 的第二部分,以简单明了的方式解释了企业版的所有步骤。
如果你只有基本许可证,要运行 kNN 搜索,你需要在 Elasticsearch 之外将数据转换为有意义的向量值,并将其作为 dense_vector 字段值添加到文档中。
为了将文本转换为相应的向量,我们使用了一个 Python 项目,你可以从我们的 GitHub 页面 [2] 轻松克隆和研究。
以下是自动从语料库创建向量 Embedding 的 Python 脚本:
https://github.com/SeaseLtd/vector-search-elastic-tutorial/blob/main/from_text_to_vectors/batch-sentence-transformers.py
from sentence_transformers import SentenceTransformerimport torchimport sysfrom itertools import isliceimport timeBATCH_SIZE = 100INFO_UPDATE_FACTOR = 1MODEL_NAME = 'all-MiniLM-L6-v2'# Load or create a SentenceTransformer model.model = SentenceTransformer(MODEL_NAME)# Get device like 'cuda'/'cpu' that should be used for computation.if torch.cuda.is_available():model = model.to(torch.device("cuda"))print(model.device)def batch_encode_to_vectors(input_filename, output_filename):# Open the file containing text.with open(input_filename, 'r') as documents_file:# Open the file in which the vectors will be saved.with open(output_filename, 'w+') as out:processed = 0# Processing 100 documents at a time.for n_lines in iter(lambda: tuple(islice(documents_file, BATCH_SIZE)), ()):processed += 1if processed % INFO_UPDATE_FACTOR == 0:print("Processed {} batch of documents".format(processed))# Create sentence embeddingvectors = encode(n_lines)# Write each vector into the output file.for v in vectors:out.write(','.join([str(i) for i in v]))out.write('\n')def encode(documents):embeddings = model.encode(documents, show_progress_bar=True)print('Vector dimension: ' + str(len(embeddings[0])))return embeddingsdef main():input_filename = sys.argv[1]output_filename = sys.argv[2]initial_time = time.time()batch_encode_to_vectors(input_filename, output_filename)finish_time = time.time()print('Vectors created in {:f} seconds\n'.format(finish_time - initial_time))if __name__ == "__main__":main()
我们使用以下命令执行该脚本:
python batch-sentence-transformers.py "./example_input/documents_10k.tsv" "./example_output/vector_documents_10k.tsv"
回复:
Processed 1 batch of documentsBatches: 100%|██████████| 4/4 [00:04<00:00, 1.08s/it]Vector dimension: 384......Processed 100 batch of documentsBatches: 100%|██████████| 4/4 [00:02<00:00, 1.35it/s]Vector dimension: 384Vectors created in 402.041406 seconds
SentenceTransformers 是一个 Python 框架,你可以使用它计算句子 / 文本的 Embedding。它提供了许多预训练模型,针对不同任务进行了调优。
在本教程中,我们使用了 all-MiniLM-L6-v2(BERT)模型,它将句子映射到一个 384 维的稠密向量空间。
我们从 MS MARCO(一个用于深度学习的大规模信息检索数据集集合)下载了一个包含大约 10,000 个文档的检索集合,并对其进行了索引。
该 Python 脚本的输入是一个包含 10,000 个文档的文件(即 MS MARCO 检索集合的一小部分):
sys.argv[1] = “/path/to/documents_10k.tsv”
案例 1 文档:
The presence of communication amid scientific minds was equally important to the success of the Manhattan Project as scientific intellect was. The only cloud hanging over the impressive achievement of the atomic researchers and engineers is what their success truly meant; hundreds of thousands of innocent lives obliterated.
它将输出一个包含相应向量的文件:
sys.argv[2] = “/path/to/vector_documents_10k.tsv”
案例 1 文档:
0.0367823,0.072423555,0.04770486,0.034890372,0.061810732,0.002282318,0.05258357,0.013747136,...,0.0054274425
为了阅读方便,我们通过在回答中插入省略号来缩短向量的长度。
接下来,需要手动将获取的 Embedding 向量加载到 Elasticsearch 中(我们将在文档索引的部分详细介绍这个过程)。
在安装和启动 Elasticsearch 之后,我们可以开始创建一个索引,使用显式映射来精确定义数据的结构。
以下是创建 “neural_index” 索引的 API 请求:
curl http://localhost:9200/neural_index/ -XPUT -H 'Content-Type: application/json' -d '{"mappings": {"properties": {"general_text_vector": {"type": "dense_vector","dims": 384,"index": true,"similarity": "cosine"},"general_text": {"type": "text"},"color": {"type": "text"}}}}'
为了检查索引的创建情况,以下是返回有关索引信息的 API 请求:
curl -XGET http://localhost:9200/neural_index
根据我们的映射定义,文档包含三个简单的字段:
general_text_vector:存储由前面部分中的 Python 脚本生成的 Embedding 向量。
文档文本:source 字段,包含要转换为向量的文本。
color:一个附加字段,仅用于展示筛选查询的行为(我们将在搜索部分看到)。
最后两个字段被定义为文本类型,而第一个字段被定义为稠密向量字段。
Elasticsearch 目前通过 dense_vector 字段类型支持存储向量(浮点值),并使用它们计算文档得分。在这种情况下,我们使用以下定义:
dims:(整数)稠密向量的维度,需要与模型的维度相等。在此例中为 384。
index:(布尔值)默认为 false,但你需要将其设置为 "index":true 以使用 kNN 搜索 API 搜索向量字段。
similarity:(字符串)用于返回最相似的前 K 个向量的向量相似性函数。在此例中,我们选择了余弦相似度(而不是 L2 范数或点积)。仅在 index 为 true 时需要指定。
我们将 index_options 保留为默认值;这一部分配置了与当前算法(HNSW)密切相关的高级参数,它们会影响索引时图形的构建方式。
目前的限制是:
1)已索引向量("index":true)的基数限制为 1024,未索引向量的基数限制为 2048。
2)dense_vector 字段不支持以下功能:
排序或聚合
多值
在嵌套映射中索引向量
一旦我们创建了向量 Embedding 和索引,就可以开始推送一些文档了。
以下是可以使用的_bulk 请求 API 将文档推送到你的 neural_index。
例如,使用一个文档:
curl http://localhost:9200/neural_index/_bulk -XPOST -H 'Content-Type: application/json' -d '{"index": {"_id": "0"}}{"general_text": "The presence of communication amid scientific minds was equally important to the success of the Manhattan Project as scientific intellect was. The only cloud hanging over the impressive achievement of the atomic researchers and engineers is what their success truly meant; hundreds of thousands of innocent lives obliterated.", "general_text_vector": [0.0367823, 0.072423555, ..., 0.0054274425], "color": "black"}'
为了方便阅读,我们在请求中插入了省略号,以缩短向量的长度。
自动创建_bulk API 请求体的方法:
https://github.com/SeaseLtd/vector-search-elastic-tutorial/blob/main/indexing_phase/create_body_for_bulk.py
由于向量 Embedding 非常长,我们建议使用另一种方法来索引多个文档,即使用 Elasticsearch 的官方 Python 客户端 elasticsearch。
以下是我们用于一次性索引文档批次的自定义 Python 脚本:
https://github.com/SeaseLtd/vector-search-elastic-tutorial/blob/main/indexing_phase/indexer_elastic.py
import sysimport timeimport randomfrom elasticsearch import Elasticsearchfrom elasticsearch.helpers import bulkBATCH_SIZE = 1000# Elastic configuration.ELASTIC_ADDRESS = "http://localhost:9200"INDEX_NAME = "neural_index"def index_documents(documents_filename, embedding_filename, index_name, client):# Open the file containing text.with open(documents_filename, "r") as documents_file:# Open the file containing vectors.with open(embedding_filename, "r") as vectors_file:documents = []# For each document creates a JSON document including both text and related vector.for index, (document, vector_string) in enumerate(zip(documents_file, vectors_file)):vector = [float(w) for w in vector_string.split(",")]# Generate color value randomly (additional feature to show FILTER query behaviour).color = random.choice(['red', 'green', 'white', 'black'])doc = {"_id": str(index),"general_text": document,"general_text_vector": vector,"color": color,}# Append JSON document to a list.documents.append(doc)# To index batches of documents at a time.if index % BATCH_SIZE == 0 and index != 0:# How you'd index data to Elastic.indexing = bulk(client, documents, index=index_name)documents = []print("Success - %s , Failed - %s" % (indexing[0], len(indexing[1])))# To index the rest, when 'documents' list < BATCH_SIZE.if documents:bulk(client, documents, index=index_name)print("Finished")def main():document_filename = sys.argv[1]embedding_filename = sys.argv[2]# Declare a client instance of the Python Elasticsearch library.client = Elasticsearch(hosts=[ELASTIC_ADDRESS])initial_time = time.time()index_documents(document_filename, embedding_filename, INDEX_NAME, client)finish_time = time.time()print('Documents indexed in {:f} seconds\n'.format(finish_time - initial_time))if __name__ == "__main__":main()
我们使用以下命令执行脚本:
python indexer_elastic.py"../from_text_to_vectors/example_input/documents_10k.tsv""../from_text_to_vectors/example_output/vector_documents_10k.tsv"
回复:
Success - 1001 , Failed - 0Success - 1000 , Failed - 0...FinishedDocuments indexed in 19.828323 seconds
Python 脚本将输入 2 个文件,一个包含文本,一个包含相应的向量:
sys.argv[1] = “/path/to/documents_10k.tsv”
sys.argv[2] = “/path/to/vector_documents_10k.tsv”
对于两个文件的每个元素,脚本将创建一个包含 id、文本、向量和 color 的单个 JSON 文档,并将其添加到一个列表中。当列表达到设置的 BATCH_SIZE 时,脚本会将 JSON 文档批量推送到 Elasticsearch。
例如 JSON:
{**'_id'**: '0', **'general_text'**: 'The presence of communication amid scientific minds was equally important to the success of the Manhattan Project as scientific intellect was. The only cloud hanging over the impressive achievement of the atomic researchers and engineers is what their success truly meant; hundreds of thousands of innocent lives obliterated.\n', **'general_text_vector'**: [0.0367823, 0.072423555, 0.04770486, 0.034890372, 0.061810732, 0.002282318, 0.05258357, 0.013747136, -0.0060595, 0.020382827, 0.022016432, 0.017639274, ..., 0.0054274425], **'color'**: 'black'}
在这一步之后,已经在 Elasticsearch 中索引了 10,000 个文档,并且我们已经准备好根据查询检索这些文档。
要检查文档数量,你可以使用 cat indices API,该 API 可以显示集群中每个索引的高级信息:
curl -XGET http://localhost:9200/_cat/indices
或者:
curl -XGET http://localhost:9200/_cat/count/neural_index?v
稠密向量字段可以通过以下方式使用:
精确的暴力 kNN:使用 script_score 查询
近似的 kNN:使用搜索 API 中的 knn 选项,找到与查询向量最相似的前 k 个向量
为了进行一些查询,我们从 MS Marco 下载了查询集:queries.tar.gz[3]
下面示例中的查询是:“what is a bank transit number”。为了将其转换为向量,我们运行了一个自定义的 Python 脚本:
from sentence_transformers import SentenceTransformer# The sentence we like to encode.sentences = ["what is a bank transit number"]# Load or create a SentenceTransformer model.model = SentenceTransformer('sentence-transformers/all-MiniLM-L6-v2')# Compute sentence embeddings.embeddings = model.encode(sentences)# Create a list object, comma separated.vector_embeddings = list(embeddings)print(vector_embeddings)
让我们使用以下命令执行脚本:
python single-sentence-transformers.py
输出是一个浮点数组:
[array([-9.01364535e-03, -7.26634488e-02, -1.73818860e-02, ..., ..., -1.16323479e-01],dtype=float32)]
现在你可以复制并使用在 kNN 查询中获得的向量。
以下是 Elasticsearch 中神经搜索查询的几个示例。
精确的 kNN
通过运行包含向量函数的 script_score 查询,可以计算查询向量与索引中每个向量的相似度,并按照 script_score 进行排名。
请求:
curl http://localhost:9200/neural_index/_search -XPOST -H 'Content-Type: application/json' -d '{"query": {"script_score": {"query" : {"match_all": {}},"script": {"source": "cosineSimilarity(params.queryVector, '\''general_text_vector'\'') + 1.0","params": {"queryVector": [-9.01364535e-03, -7.26634488e-02, ..., -1.16323479e-01]}}}}}'
在这种情况下,我们使用了 match_all 查询来匹配所有文档,但是除非你处理的是非常小的索引,否则这个查询并不具备可扩展性,可能会显著增加搜索延迟。
如果你想在大型数据集上使用此查询,建议在 script_score 中指定一个过滤查询,以限制传递给向量函数的匹配文档数量。
近似的 kNN
为什么是近似呢?因为 Elasticsearch 使用了一种近似方法来执行 kNN 搜索(即 HNSW),它为了提高搜索速度和减少计算复杂性(尤其是在大型数据集上),牺牲了结果的准确性;因此,搜索结果可能并不总是真正的 k 个最近邻。
请求:
curl http://localhost:9200/neural_index/_search -XPOST -H 'Content-Type: application/json' -d '{"knn": {"field": "general_text_vector","query_vector": [-9.01364535e-03, -7.26634488e-02, ..., -1.16323479e-01],"k": 3,"num_candidates": 10},"_source": ["general_text","color"]}'
在 _search API 中集成了 ANN(近似最近邻),通过在请求体中添加 knn 选项来使用。knn 对象具有以下定义属性:
field:(字符串)存储向量嵌入的字段
query_vector:(浮点数数组)表示查询的方括号内的浮点数列表;必须具有与向量字段相同的维度(即 384)
k:(整数)要检索的最近邻数量;必须小于 num_candidates
num_candidates:(整数)在每个分片中要考虑的近似最近邻候选数量(<= 10000);增加此数字可以提高准确性,但会降低搜索速度
响应:
{...,"hits": {"total": {"value": 3,"relation": "eq"},"max_score": 0.69120896,"hits": [{"_index": "neural_index","_id": "7686","_score": 0.69120896,"_source": {"color": "green","general_text": "A. A federal tax identification number ... of business.\n"}}, {"_index": "neural_index","_id": "7691","_score": 0.6840044,"_source": {"color": "white","general_text": "A. A federal tax identification number ... by the IRS.\n"}}, {"_index": "neural_index","_id": "7692","_score": 0.6787193,"_source": {"color": "white","general_text": "Letâs start at the beginning. A tax ID number ... for a person.\n"}}]}}
设置 topK=3 后,我们获取了对于查询 “what is a bank transit number” 最佳的三个文档。
搜索会计算每个分片中 num_candidates 个向量与查询向量的相似度(确定文档的 _score),从每个分片中选择 k 个最相似的结果,然后合并结果(来自每个分片),返回全局最相似的 k 个邻近文档。
近似 kNN + 预过滤
从 Elasticsearch 8.2 版本开始,支持预过滤功能。
下面的请求执行了一个带有 color 字段过滤器的近似 kNN 搜索:
请求:
curl http://localhost:9200/neural_index/_search -XPOST -H 'Content-Type: application/json' -d '{"knn": {"field": "general_text_vector","query_vector": [-9.01364535e-03, -7.26634488e-02, ..., -1.16323479e-01],"k": 3,"num_candidates": 10,"filter": {"term": {"color": "white"}}},"fields": ["color"],"_source": false}'
回复:
{...,"hits": {"total": {"value": 3,"relation": "eq"},"max_score": 0.6840044,"hits": [{"_index": "neural_index","_id": "7691","_score": 0.6840044,"fields": {"color": ["white"]}}, {"_index": "neural_index","_id": "7692","_score": 0.6787193,"fields": {"color": ["white"]}}, {"_index": "neural_index","_id": "7685","_score": 0.6716478,"fields": {"color": ["white"]}}]}}
设置 topK=3 后,我们获取了查询 “what is a bank transit number” 和 color 为 “white” 的最佳三个文档。
这个查询确保返回 k 个匹配的文档,因为过滤器查询是在近似 kNN 搜索期间应用的,而不是之后应用的。
近似 kNN + 其他功能
从 8.4 版本开始,还可以执行混合搜索。
在此请求中,我们通过一个 OR 条件将 knn 选项和查询组合起来。
请求:
curl http://localhost:9200/neural_index/_search -XPOST -H 'Content-Type: application/json' -d '{"query": {"match": {"general_text": {"query": "federal"}}},"knn": {"field": "general_text_vector","query_vector": [-9.01364535e-03, -7.26634488e-02, ..., -1.16323479e-01],"k": 3,"num_candidates": 10},"size": 5,"_source": ["general_text"]}'
回复:
{...,"hits": {"total": {"value": 143,"relation": "eq"},"max_score": 7.4108567,"hits": [{"_index": "neural_index","_id": "7555","_score": 7.4108567,"_source": {"general_text": "Filed under: OPM Disability Process | Tagged: appeal deadlines during the fers disability process, average time frame for fers disability retirement, civil service disability, federal disability law blog, federal disability process timelines, federal disability retirement application and process, federal disabled employees and the patience needed, ...\n"}}, {"_index": "neural_index","_id": "8014","_score": 7.395675,"_source": {"general_text": "Federal law (5 U.S.C. 6103) establishes the public holidays listed in these pages for Federal employees. Please note that most Federal employees work on a Monday through Friday schedule.\n"}}, {"_index": "neural_index","_id": "2659","_score": 7.235115,"_source": {"general_text": "The authority of the Federal Reserve Banks to issue notes comes from the Federal Reserve Act of 1913. Legally, they are liabilities of the Federal Reserve Banks and obligations of the United States government.\n"}}, {"_index": "neural_index","_id": "3337","_score": 7.1420827,"_source": {"general_text": "Federal Employee Retirement System - FERS. DEFINITION of 'Federal Employee Retirement System - FERS'. A system that became effective in 1987 and replaced the Civil Service Retirement System (CSRS) as the primary retirement plan for U.S. federal civilian employees.\n"}}, {"_index": "neural_index","_id": "580","_score": 7.111601,"_source": {"general_text": "Federal Laws vs. State Laws. Federal laws, or statutes, are created by the United States Congress to safeguard the citizens of this country. Some criminal acts are federal offenses only and must be prosecuted in U.S. District Court.\n"}}]}}
这个搜索操作:
从每个分片中收集 knn num_candidates(10)个结果;
找到全局的前 k=3 个向量匹配;
将它们与 match 查询(=federal)的匹配结果合并;
最终返回得分排名前 5 个(size=5)结果(即使总共有 143 个命中)。
得分是通过将 knn 分数和查询分数相加来计算的,还可以指定 boost 值以赋予每个分数不同的权重。
knn 选项还可以与聚合一起使用,即在前 k 个最近的文档上计算聚合,而不是在所有匹配搜索的文档上进行聚合。
二、总结
我们希望这个教程能帮助你了解如何在 Elasticsearch 中使用基于向量的搜索。
还有一些工作可以做,比如支持多值字段,改进重新排序以及与 BERT 和 Transformer 的整合。实际上,这是一个开放的 GitHub 问题 [4],他们正在进行 ANN 搜索的各种改进(包括新功能、增强功能、性能改进等)。
如果对你于密集向量的 Elasticsearch 基准测试感兴趣,你可以在这里 [5] 找到一些已发布的结果。
参考资料
【1】https://sease.io/wp-admin/post.php?post=56082&action=edit
【2】https://github.com/SeaseLtd/vector-search-elastic-tutorial
【3】https://msmarco.blob.core.windows.net/msmarcoranking/queries.tar.gz
【4】https://github.com/elastic/elasticsearch/issues/84324
【5】https://elasticsearch-benchmarks.elastic.co/#tracks/dense_vector/nightly/default/30d


如果字段的最大可能长度超过255字节,那么长度值可能…
只能说作者太用心了,优秀
感谢详解
一般干个7-8年(即30岁左右),能做到年入40w-50w;有…
230721