
刘滨,中移信息数据库运维专家。拥有Oracle OCP、OCM认证,曾多年在银行金融保险行业一线运维,目前正在积极参与国产数据库的研究以及在移动场景下的推广等工作。
GaussDB T 1.0.2版本已经发布了,此版本为GA版本,相比1.0.1版本稳定性和功能方面做了加强,华为后续也将要推出RAC版本。本文主要介绍当前GA版本下的主备集群方式安装。
主备(一主一备)部署方案无CN,其中DN主机所在的节点为主节点,对外提供业务。
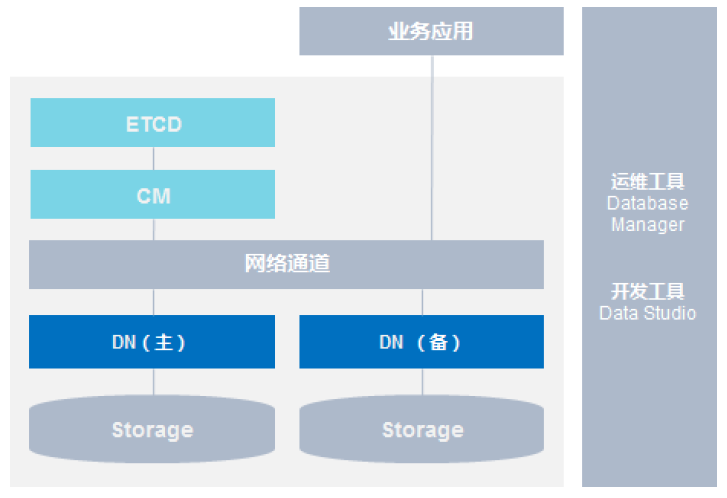
集群中各组件功能:
CM:集群管理模块(ClusterManager)。管理和监控分布式系统中各个功能单元和物理资源的运行状况,确保整个系统的稳定运行。
DN:数据节点(Datanode)。负责存储业务数据,执行数据查询任务以及返回执行结果。
ETCD:高可用分布式键值(key-value)数据库。负责存储集群各个节点和实例集群状态,便于集群CM管理各个实例。
Storage:服务器的本地存储资源,持久化存储数据。
一、环境准备
操作系统:CentOS Linux release 7.5.1804 (Core)
数据库软件:GaussDB_T_1.0.2-CLUSTER-CentOS-64bit.tar.gz

二、安装步骤
1、root远程登录权限修改(两个节点均需操作)
sed -i 's/#PermitRootLogin yes/PermitRootLogin yes/g' /etc/ssh/sshd_config
sed -i 's/#PasswordAuthentication yes/ PasswordAuthentication yes/g' /etc/ssh/sshd_config
修改完重启sshd服务:
/bin/systemctl restart sshd.service
2、关闭防火墙和SELinux(两个节点均需操作)
systemctl stop firewalld.service
systemctl disable firewalld.service
sed -i 's/SELINUX=enforcing/SELINUX=disabled/g' /etc/selinux/config
3、配置corefile(两个节点均需操作)
echo 'ulimit -c unlimited'>>/etc/profile
echo 'kernel.core_pattern =/opt/gdb/corefile/core-%e-%p-%t'>>/etc/sysctl.conf
使配置生效:
source /etc/profile
sysctl -p
4、检查ntp和lsof(两个节点均需操作)
rpm -qa|grep ntp
若没有,使用yum安装ntp:
yum install ntp
which lsof
若没有,使用yum安装lsof:
yum install lsof
5、创建数据库安装用户组和用户(两个节点均需操作)
groupadd dbgrp
useradd -g dbgrp -d /home/omm -m -s /bin/bash omm
设置密码:
passwd omm
6、创建存放软件包的目录/opt/software/gaussdb并上传安装包
mkdir -p /opt/software/gaussdb
[root@gauss1 gaussdb]# tar -zxvf GaussDB_T_1.0.2-CENTOS7.5-X86.tar.gz
[root@gauss1 gaussdb]# tar -zxvf GaussDB_T_1.0.2-CLUSTER-CentOS-64bit.tar.gz
[root@gauss1 gaussdb]# chmod 755 /opt/software/
[root@gauss1 gaussdb]# chmod -R 755 /opt/software/gaussdb/
7、从/opt/software/gaussdb/template获取预置的配置文件,根据实际部署需求修改配置
[root@gauss1 ~]# vi /opt/software/gaussdb/clusterconfig.xml
<?xml version="1.0" encoding="UTF-8"?>
<ROOT>
<!-- -->
<CLUSTER>
<PARAM name="clusterName" value="GaussDB_100"/>
<PARAM name="nodeNames" value="gauss1,gauss2"/>
<PARAM name="gaussdbAppPath" value="/opt/gaussdb/app"/>
<PARAM name="gaussdbLogPath" value="/opt/gaussdb/log/"/>
<PARAM name="tmpMppdbPath" value="/opt/gaussdb/tmp/gaussdb_mppdb"/>
<PARAM name="gaussdbToolPath" value="/opt/gaussdb/huawei/wisequery"/>
<PARAM name="datanodeType" value="DN_ZENITH_HA"/>
<PARAM name="coordinatorType" value="CN_ZENITH_ZSHARDING"/>
<PARAM name="replicationCount" value="2"/>
<PARAM name="clusterType" value="mutil-AZ"/>
<!-- HA2 -->
<PARAM name="Ha2Node" value="true"/>
<PARAM name="GatewayIP" value="192.168.238.2"/>
<PARAM name="CMAgentPingTryTime" value="3"/>
<PARAM name="CMAgentPingInterval" value="5"/>
<!--floatip-->
<PARAM name="ServiceType" value="SingleService"/>
</CLUSTER>
<!-- -->
<DEVICELIST>
<!-- plat1 -->
<DEVICE sn="1000001">
<PARAM name="name" value="gauss1"/>
<PARAM name="azName" value="AZ1"/>
<PARAM name="azPriority" value="1"/>
<!-- IP -->
<PARAM name="backIp1" value="192.168.238.130"/>
<PARAM name="sshIp1" value="192.168.238.130"/>
<PARAM name="agentlsnPort" value="7020"/>
<!-- GTS -->
<!-- ETCD -->
<PARAM name="etcdNum" value="2"/>
<PARAM name="etcdListenPort" value="22100"/>
<PARAM name="etcdHaPort" value="22200"/>
<PARAM name="etcdListenIp1" value="192.168.238.130"/>
<PARAM name="etcdHaIp1" value="192.168.238.130"/>
<PARAM name="etcdDir1" value="/opt/gaussdb/data/data_etcd"/>
<PARAM name="etcdDir2" value="/opt/gaussdb/data/data_etcd1"/>
<!--cn-->
<!-- dn -->
<PARAM name="dataNum" value="1"/>
<PARAM name="dataPortBase" value="15402"/>
<PARAM name="dataNode1" value="/opt/gaussdb/data/data_dn1,gauss2,/opt/gaussdb/data/data_dn1"/>
</DEVICE>
<!-- plat2 -->
<DEVICE sn="1000002">
<PARAM name="name" value="gauss2"/>
<PARAM name="azName" value="AZ1"/>
<PARAM name="azPriority" value="1"/>
<!--IP -->
<PARAM name="backIp1" value="192.168.238.131"/>
<PARAM name="sshIp1" value="192.168.238.131"/>
<PARAM name="agentlsnPort" value="7020"/>
<!-- ETCD -->
<PARAM name="etcdNum" value="1"/>
<PARAM name="etcdListenPort" value="22100"/>
<PARAM name="etcdHaPort" value="22200"/>
<PARAM name="etcdListenIp1" value="192.168.238.131"/>
<PARAM name="etcdHaIp1" value="192.168.238.131"/>
<PARAM name="etcdDir1" value="/opt/gaussdb/data/data_etcd"/>
<!--cn-->
<!-- dn -->
<!-- cm -->
<PARAM name="cmsNum" value="1"/>
<PARAM name="cmServerPortBase" value="21900"/>
<PARAM name="cmServerListenIp1" value="192.168.238.131,192.168.238.130"/>
<PARAM name="cmServerHaIp1" value="192.168.238.131,192.168.238.130"/>
<PARAM name="cmServerlevel" value="1"/>
<PARAM name="cmServerRelation" value="gauss2,gauss1"/>
</DEVICE>
</DEVICELIST>
</ROOT>
8、安装python3.7(如果环境已安装请忽略)
安装依赖包:
yum -y groupinstall "Development tools"
yum -y install zlib-devel bzip2-devel openssl-devel ncurses-devel sqlite-devel readline-devel tk-devel gdbm-devel db4-devel libpcap-devel xz-devel
yum install libffi-devel -y
yum install -y gcc
下载python3安装包:
cd /root
wget https://www.python.org/ftp/python/3.7.0/Python-3.7.0.tar.xz
tar -xvJf Python-3.7.0.tar.xz
编译安装:
mkdir /usr/local/python3 #创建编译安装目录
cd Python-3.7.0
./configure --prefix=/usr/local/python3
make && make install
创建软连接:
ln -s /usr/local/python3/bin/python3 /usr/local/bin/python3
验证下安装:
python3 -V
pip3 –V
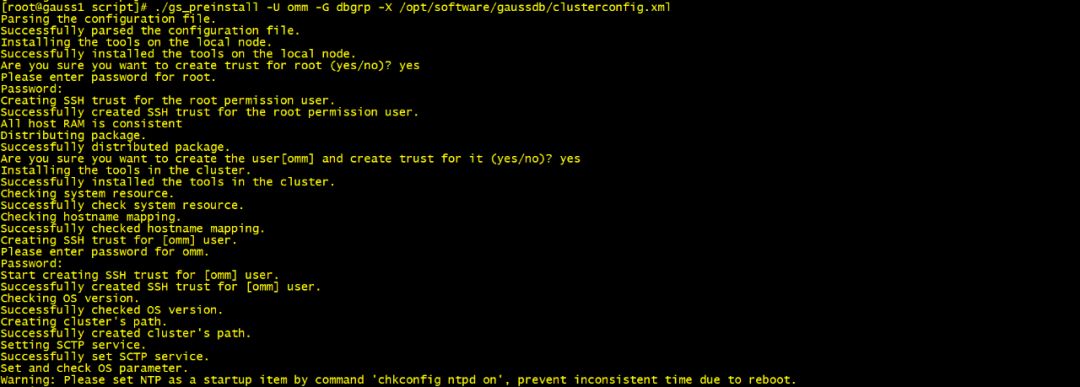
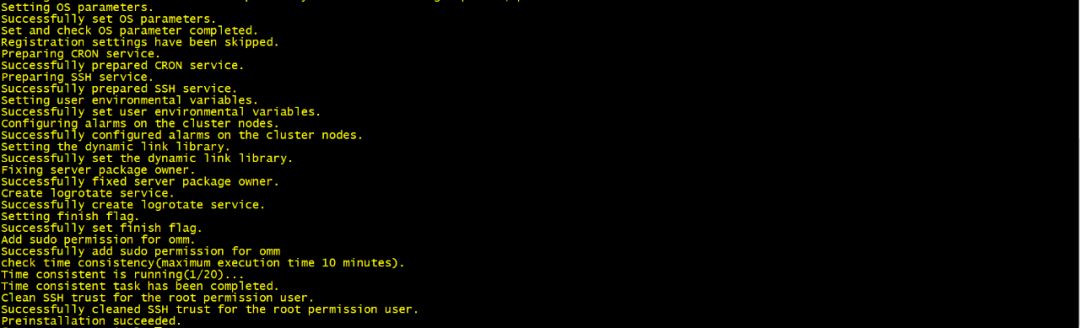
9、执行gs_preinstall准备环境
[root@gauss1 gaussdb]# cd /opt/software/gaussdb/script/
[root@gauss1 script]# ./gs_preinstall -U omm -G dbgrp –X /opt/software/gaussdb/clusterconfig.xml
10、检测集群时间一致性
[root@gauss1 script]# ./gs_checkos -i B -h gauss1,gauss2 -X /opt/software/gaussdb/clusterconfig.xml

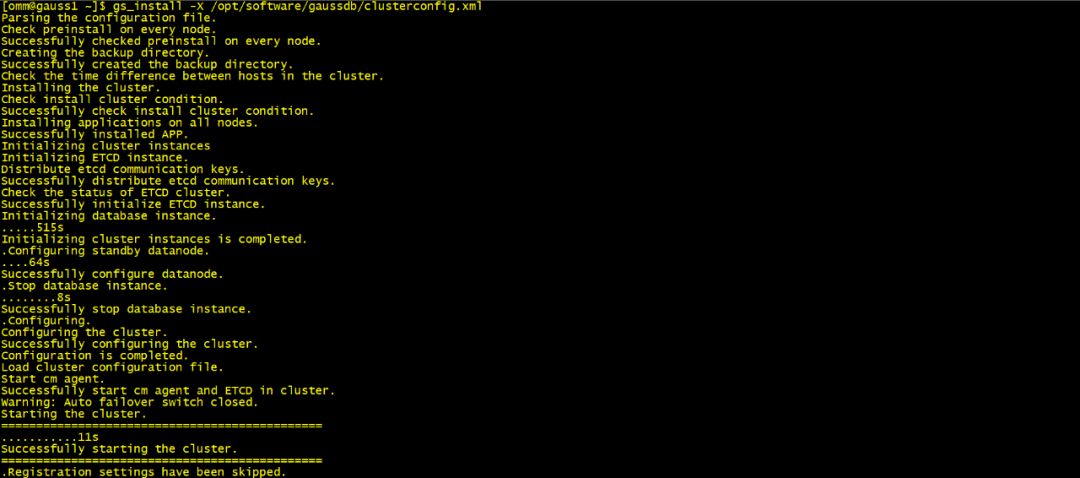
11、执行安装脚本
[root@gauss1 script]# su - omm
[omm@gauss1 ~]$ gs_install -X /opt/software/gaussdb/clusterconfig.xml
12、检查集群状态

安装完成!
三、安装过程中报错处理
1、执行./gs_preinstall报GAUSS-50204
[root@gauss1 script]# ./gs_preinstall -U omm -G dbgrp -X /opt/software/gaussdb/clusterconfig.xml
[GAUSS-50204] : Failed to read cmServerRelation. The first item of cmServerRelation must be nodename.
解决:修改clusterconfig.xml文件中cmServerRelation值为gauss2,gauss1与nodeNames值对应。
2、执行./gs_preinstall报GAUSS-53011
[root@gauss1 script]# ./gs_preinstall -U omm -G dbgrp -X /opt/software/gaussdb/clusterconfig.xml
Parsing the configuration file.
Successfully parsed the configuration file.
Installing the tools on the local node.
Successfully installed the tools on the local node.
Are you sure you want to create trust for root (yes/no)? yes
Please enter password for root.
Password:
Creating SSH trust for the root permission user.
Successfully created SSH trust for the root permission user.
All host RAM is consistent
Distributing package.
Successfully distributed package.
Are you sure you want to create the user[omm] and create trust for it (yes/no)? yes
Installing the tools in the cluster.
Successfully installed the tools in the cluster.
Checking system resource.
[FAILURE] gauss1:
[GAUSS-53011] : Failed to check gatewayIP [192.168.238.10]. Please check gatewayIP config is vaild in your environment.
[FAILURE] gauss2:
[GAUSS-53011] : Failed to check gatewayIP [192.168.238.10]. Please check gatewayIP config is vaild in your environment.
解决:修改clusterconfig.xml文件中GatewayIP为虚拟机网关地址192.168.238.2。
3、检测集群时间一致性有警告
[root@gauss1 script]# ./gs_checkos -i A12 -h gauss1,gauss2 -X /opt/software/gaussdb/clusterconfig.xml --detail
Root permission user has not SSH trust, create it when do checkos in remote node.
Creating SSH trust for the root permission user.
Please enter password for root.
Password:
Successfully creating SSH trust for the root permission user.
Checking items
A12.[ Time consistency status ] : Warning
[gauss1]
The current system time = (2020-03-06 16:37:43")
[gauss2]
The current system time = (2020-03-06 16:37:45")
Total numbers:1. Abnormal numbers:0. Warning numbers:1.
Clean SSH trust for the root permission user.
Successfully clean SSH trust for the root permission user.
解决:重新同步系统时间。
[root@gauss1 ~]# cd /opt/software/gaussdb/script
[root@gauss1 script]# ./gs_checkos -i C1 -h gauss1,gauss2 -X /opt/software/gaussdb/clusterconfig.xml
Root permission user has not SSH trust, create it when do checkos in remote node.
Creating SSH trust for the root permission user.
Please enter password for root.
Password:
Successfully creating SSH trust for the root permission user.
C1. [ Set NTP Service ] : Normal
NOTICE: MTU value and some warning items can NOT be set. Please do it manually.
Total numbers:1. Abnormal numbers:0. Warning numbers:0.
Clean SSH trust for the root permission user.
Successfully clean SSH trust for the root permission user.
四、集群卸载
1、omm用户执行gs_uninstall --delete-data -X
/opt/software/gaussdb/clusterconfig.xml
[omm@gauss1 ~]$ gs_uninstall --delete-data -X /opt/software/gaussdb/clusterconfig.xml
The data will be deleted and cannot be recovered. Are you sure you want to uninstall the cluster(yes/no)?yes
Check preinstall on every node.
Successfully checked preinstall on every node.
Stop cluster.
Check logfile path.
Clean crontab.
Clean crontab successfully.
Kill process for components.
Kill process for components successfully.
Uninstall components
Uninstall components successfully.
Modifying user's environmental variable.
Successfully modified user's environmental variable.
Clean tmp files and logs.
Successfully clean cluster's tmp and logs.
Successful uninstallation
2、清理主机的环境
[root@gauss1 script]# ./gs_postuninstall -U omm -X /opt/software/gaussdb/clusterconfig.xml
The environment will be cleaned up and cannot be recovered.Are you sure you want to clean up the environment(yes/no)?yes
Parsing the configuration file.
Successfully parsed the configuration file.
Checking unpreinstallation.
Success checking unpreinstallation.
Deleting the instance paths.
Deleting the instance paths successfully.
Clean log and dependency.
Clean up the user environment variables
Clean up the user environment variable successfully
Clean up the remote system tool environment variables
Clean up the remote system tool environment variable successfully
Clean up the local system tool environment variables
Clean up the local system tool environment variable successfully
Clean log and dependency successfully.
Postuninstall successfully.
Please close the terminal and login again, ensure that the environment variable takes effect.
《All in Cloud 时代,下一代云原生数据库技术与趋势》阿里巴巴集团副总裁/达摩院首席数据库科学家 李飞飞(飞刀)
《AI和云原生时代的数据库进化之路》腾讯数据库产品中心总经理 林晓斌(丁奇)
《ICBC的MySQL探索之路》工商银行软件开发中心 魏亚东
《金融行业MySQL高可用实践》爱可生技术总监 明溪源
《民生银行在SQL审核方面的探索和实践》民生银行 资深数据库专家 李宁宁
《OceanBase分布式数据库在西安银行的落地和实践》蚂蚁金服P9资深专家/OceanBase核心负责人 蒋志勇


如果字段的最大可能长度超过255字节,那么长度值可能…
只能说作者太用心了,优秀
感谢详解
一般干个7-8年(即30岁左右),能做到年入40w-50w;有…
230721